Cannabis cultivation indoors can be daunting process. After all, growing weed indoors requires you to replicate Mother Nature’s great outdoors inside a space – you’re bringing outside inside. Cannabis cultivation indoors is no small task and, when done right, it’s amazingly rewarding.
In this post we will cover the keys to cannabis cultivation indoors: selecting/creating a space, lighting and ventilation, control systems and growing medium/process, nutrients, water and pest management.
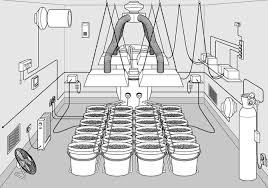
Select/Create Your Cannabis Grow Space
Start Small
 With cannabis cultivation indoors, it is easier to learn, and fail, with a small amount of plants (2 or 3) than it is when you’re starting out with 15 or more! Unless you’ve already grown some other plants indoors (orchids, veggies) or you have an especially green thumb, you will have failures your first time or two.
One way to mitigate failure is to work with a mentor; if you don’t know someone who is already good at growing weed you’re working from a disadvantage. Having someone to talk with about your grow is an important part of learning to be successful on your own.
Think Big
Even though you’re starting out with a handful of plants, you still have to build out your space for a maximum load. As you scale up, you’ll want to have your infrastructure in place so all you have to do is get more clones, not re-configure the entire room each time you set up a grow (you’ll already have to clean it thoroughly between cycles ESPECIALLY if you had a pest issue).
Cannabis cultivation indoors is not easy. There’s a lot of detail work and each time you cycle the room you’ve got to clean it as part of getting ready for the next cycle.
Keep it clean
The two biggest systemic problems you’ll have are: mildew and pests. One way to mitigate them is by keeping your grow room clean during the grow cycle, and by performing a complete cleaning of the room between grow cycles.
You’ll want to keep the room as clean as you can regardless; you don’t want to smoke weed which has been grown indoors in a room which ISN’T clean … lots of things can happen to the plants which aren’t good!
Keep it secure
We mean “secure” two ways: secure from unwanted visitors and secure from unwanted pests.
Convenience
By convenience we mean: Access. You’ll want to have an easy way for you to gain access and you’ll need to make sure “prying eyes” can’t. After all, even if cannabis cultivation indoors is legal where you live, you probably don’t want your neighbor’s to see it or smell it.
Temperature and Humidity concerns
The most important elements to control in an indoor grow are temperature and humidity. Balancing these two is critical to having a successful grow which doesn’t develop any pest or mildew problems.
Stealth
Here’s the thing about building an indoor grow: you have to be ‘stealthy’ if you want to keep it secure. Something’s are obvious (like a load of lumber being delivered so you can reconfigure your garage) and some things are just weird, like adding external ventilation ports to your roof.
The less obvious (and weird) the better – in some states the Utility Company will become suspicious if you start to use too much electricity all of sudden, which brings us to Lights.
Lights
Since you’re recreating the outside environment in your indoor grow, the most important thing is Light (and temperature and humidity as noted above, however, these can all be managed by using the right lighting system).
Tradeoff’s
Choose carefully, there are tradeoff’s including efficiency and heat. At this point in time, Spring 2020, LED Grow Lights have become very reliable alternative to heat generating HPS lights (see table below). And, with LED systems, you can mimic the UV Spectrum of the sun as it changes over the course of the outdoor grow cycle (think about how the sun changes from Spring to Fall, LED lights can provide the same types of UV light which occurs outdoors).
| TYPE OF LIGHT | KNOWN AS | TRADEOFFS |
|---|---|---|
| Metal Halide | MH | * Ballasts create significant heat * Expensive to run |
| High Pressure Sodium | HPS | * Ballasts create significant heat * Benefits the Flowing Phase the most * Expensive to run |
| Fluorescent High Output | HO | * Ballasts create heat * Expensive to run |
| LED Grow Lights | LED | * Expensive to setup - needs technology infrastructure * About 25% less expensive to run than ballast driven lights * Programmable and can replicate natural UV settings thru the entire grow cycle |
AIRFLOW
With cannabis cultivation indoors we care about airflow for these reasons:
- The breeze the fans will create make the plants stronger. Think about how the wind helps plants outside get “big and strong”
- Correct airflow (including creating negative pressure in the room) helps to manage Temperature and Humidity.
Temperature and Humidity
Once again we point out how important Temperature and Humidity are to a successful grow room. When you have the right combination of lights, growing medium and airflow then controlling temperature and humidity is much easier.
The goals for Temperature and Humidity are show in the table below:
| MEASUREMENT | GROW PHASE | LEVEL |
|---|---|---|
| Humidity | Clones and Starts | 70% |
| Humidity | Vegetative = 40- 60% | 40% - 60% |
| Humidity | Flowering | 40% - 60% |
| Humidity | Final 3 Weeks | 40% - 45% |
| Temperature | LIGHTS ON | 70 - 80 degrees F 21 - 27 degrees C |
| Temperature | LIGHT OFF | 5 to 10 degrees cooler |
Pests
There are several types of pests to manage:
- Soil borne
- Airborne
- “Hitchhikers”
Soil Borne
Soil borne are the critters (like mites) which came in with your soil (if you’re growing in dirt). One way to fight mites is to release ladybugs into the room. Ladybugs are like Rumba vacuums, they’re always crawling around on the plants eating pests and cleaning the plants as they go.
Airborne
Airborne flew in when the door was open. Creating negative pressure in the room can help to mitigate this, as will have fine screens on your intake and output vents.
Hitchhikers
“Hitchhikers” came in on your clothes and shoes. You can step into some bleach before entry to take care of your shoes and you might consider getting a ‘clean room’ jumpsuit to put on over your clothes.
Controls and Monitoring
Cannabis cultivation indoors depends on the types of controls and monitoring you’re doing during the grow cycle. Here are some things to think about:
Lighting Timers
When plants are seedlings (and during the vegetation phase) the lights should be on 18 – 20 hours per day. Once you’re ready to trigger the Flowering Phase you’ll “flip” the lights to 12 hours on and 12 hours off.
Simple systems use a timer on the power box, more complex systems use a computer to control the lights and their relative UV output (e.g., LED Lighting Systems)
Temperature and Humidity Controls
As we discussed in the previous section, controlling temperature and humidity is critical. One way to help manage this is to incorporate a de-humidifier into your room.
Again, you’ll need to monitor the room for temperature and humidity to maintain the optimal settings during each phase of your grow cycle.
H2O Ph
The Ph of the water you’ll be using needs to be established at the start of the grow. Once you know what the Ph levels are you can manage by filtering the water and adding nutrients to the water when it’s time to feed the plants.
Most “nutrient systems” (e.g., General Hydroponics) have balanced their products to work with Ph neutral water.
Cannabis Grow Medium
Soil or hydroponic? Amended soil or DYI? These are just some of the questions to consider with cannabis cultivation indoors. Remember: you’re trying to replicate Mother Nature so the medium you choose is critical.
Potting Soil
We mean regular, generic, potting soil. Not necessarily the best option, but, if you don’t have a choice it will work. Be wary of soil borne pests.
Super Soil or Amended Soil
Super Soil, like Fox Farms brand, is configured with nutrients added for cannabis production. Things like bat guano and worm castings which provide nitrogen.
DYI
If you’re REALLY into dirt you can Do It Yourself using your compost pile. A “home brew” customized to your specific needs!
Typically, DYI dirt is made after you’ve got some experience with your indoor grow and you understand your Grow Room’s specific challenges.
Hydroponics
Growing hydroponically is complex and will require a stand-alone Blog post. The key difference is: you don’t use soil and you need a more complicated system for keeping the plant’s roots wet.
Plant Containers
Remember at the beginning of this post we talked about the Goal of your Grow Room? This gets to the heart of the Plant Containers conversation.
Everything gets down to how “big” (height and diameter) you want to grow your plants.
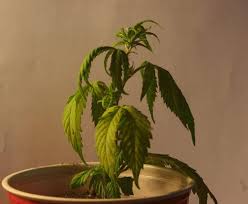
Cannabis Plant Roots
Cannabis plants have a “root ball” (insert picture) which resembles cotton candy. How big the plants will grow depends on how much room there is in the container. Once a cannabis plant gets ‘root bound’ it won’t grow either taller or in diameter.
The factors in the table below all contribute to the decision about how large (and what type) of plant containers to use.
-
ITEM CONSIDERATION Plant Yield Goal This may take some time to actualize. It is good to have a goal and work your room to maximize it. Size of Room If your room is a converted garage, you might choose to use 5 gallon ridge pots. If your room is 1/2 a closet, you might consider 1 gallon soft pots. Medium If you're in soil, the same example above applies.
Nutrients
All plants need nutrients to supplement what’s in the soil and cannabis is no exception to the rule. In fact, cannabis growers spend a lot of time working on their nutrient mixes.
Cannabis requires different nutrients during different phases of the grow cycle. Basically, when they’re young and vegging the plants crave nitrogen. During the flowering and finishing phases, they drink up phosphorus and potassium.
This chart shows the Marco (and Micro) nutrients needed during the grow cycle:
| CATEGORY | NUTRIENT |
|---|---|
| Macro | Nitrogen (N) |
| Phosphorus (P) | |
| Potassium (K) | |
| Mirco | Calcium |
| Magnesium | |
| Iron | |
| Copper |
Flushing the Grow
A word about “flushing”. During the last three weeks (or so) of growth, you will stop adding any nutrients to your water mix and just give the plants water. The last three or four watering cycles are just water so that the plants can flush out any accumulated nutrients in their systems. By just giving them water, they can remove any residue left behind.
So, how do you know if the cannabis you’re smoking was “flushed” correctly? The proof is in the pudding, or, specifically, the ash left behind (really easy to see when you use a pipe of bong).
Properly flushed cannabis ash will look like the remains of a burnt butterfly wing – very light and slight, more white/grey than black. If the ash looks like this: Good Job!
Black Ash: Not Good
If the ash is black and/or chunky, someone did NOT flush correctly and that weed is still full of residue and whatever else was used during its’ grow.
Water
 We discussed the importance of knowing your water’s Ph level and we mentioned one of the ways to manage water impurities is with filters.
We haven’t discussed the frequency of watering, which can be the #1 cause of problems in an indoor (or outdoor) grow. So, let’s discuss.
Frequency/Overwatering
How much and how often should you water your plants? One thing to remember is cannabis originated in an arid, desert, environment and the reason it’s been called “weed” was the notion it grew like weeds.
This is why the cannabis root-ball is such a delicate network: it absorbs minute amounts of water very efficiently.
Use Your Finger!
So, what’s a good strategy? Use your Finger! When the soil in a plant’s container is dry all the way down when you stick your finger in the dirt, then, it’s PROBABLY time to water them. The other sign you’re looking for is: are the leaves drooping or are they still pointing up?
Typically, in a room which is running with the right temperature and humidity settings, this will be every 3 to 4 days.
One more note about “reading the leaves”: cannabis leaves are very responsive to water. When they’re thirsty and the leaves are drooping downward, you can actually watch and see how, after you’ve water them, they stand back up and “reach” upward towards the light.
How Much Water Do I Apply?
The last piece of the puzzle is: how much water should I apply when I’m watering. The answer is: you have to figure that out as you go. Remember, the goal is to water the plants every 3 to 4 days, so, if you SOAK the dirt it will take longer to dry out.
Remember: it’s a Weed!
Pest Control
This section will review some common pests in an indoor cannabis grow and ways to mitigate them.
Common Pests
We mentioned spider mites and gnats earlier in the post. ADD MORE PESTS
Ways to mitigate
We talked about setting up a bleaching station for your shoes and even investing in a ‘clean-room’ jumpsuit to wear inside the grow room. One very important other mitigation technique is: don’t let anyone in the room, especially if they’ve been at another grow before visiting you.
Don’t Let Them In
If you have to show them your indoor cannabis grow, then, make sure they bleach their shoes before entering (at a minimum) and if you have another jumpsuit, ask them to put it on.
You don’t want any hitchhikers from the other grow site to contaminate your room and all your hard work!
Join Us On Tour
For more information about growing cannabis indoors Book a Happy Travelers Tours Cannabis Dispensary Tour and go on our exclusive ‘back-room’ tour at our indoor grow partner!