We’ve published a couple of articles on how to grow marijuana under Cannabis Cultivation Outdoors, How To Build Hoop-Style Greenhouses and Cannabis Cultivation Indoors. These articles are good starting points to learn how to grow marijuana; this article will talk about several things to consider.
Strains and Other Considerations
First up: strains and other considerations. Let’s start with: do you have a preference when it comes to the kind of cannabis you consume? If you’re a ‘body high’ type of person, then, consider Indica and Indica-dominate hybrids.
If, on the other hand, you like a cerebral high, then, consider working with Sativas. Another consideration is: how long is the grow cycle? If you’re thinking quick turns in an indoor room, then, you should focus on the strains with 90 day cycles (from Flowering).
On the other hand, if you’re not concerned with “cycling the room” as frequently as you can, then you might think about the longer flowering strains: ones which need 120 days to mature.
Growing Marijuana Indoors
Continuing the thought from above, if you’re going to build out an indoor grow room, remember this: you are going to be recreating the outdoor environment inside. This means you will have to deal with: heat, air circulation, water and pests.
Space
While it’s certainly true you can set up a ‘grow room’ inside your residence, creating a space specifically for growing is the best option. When you build up a room (or set up a greenhouse) you can ensure you accommodate for: plumbing, air conditioning and dehumidifying as well as electrical work (sub-panels are often needed).
Lights
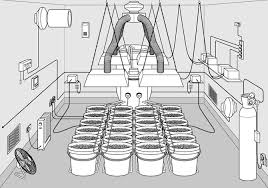 Lights are the biggest energy draw and can produce significant heat through the ballasts (if you’re using incandescent technology). LED lights have advanced in recent years to the point they’re used either as the only source of light in commercial grows or they’re being used in conjunction with sodium vapor or other lights.
There are a couple of advantages to LEDs: size, UV light spectrum and heat management are much easier to manage with LEDs. In fact, using computer controllers, the UV spectrum which the LEDs generate can be modified to mimic the natural UV spectrum changes which occur outdoors during the grow season.
Air Circulation
All grow rooms need air circulation for several reasons, including: creating ‘wind’ so the plants grow up strong, moving the air so there’s plenty of CO2 and Oxygen exchanging going on and, keeping the room cool (this is critical if you’re using ballast driven lights).
Nutrients
Both indoor and outdoor growers need to pay attention to the soil they’re using and the nutrients which get added to supplement the grow stages. Nutrient science is a deep dive unto itself and the more experience you have with your strain choices and your growing methodology (dirt versus hydroponic) the more success you’ll have over time.
Learning how to grow marijuana is a long-term process – your first foray may or may not produce an optimized yield, however, you’ll learn so much on the way that your SECOND time growing will have huge improvements.
Pest Control
Indoor pests run the gamut from mites to mold; ALL grows have to manage pests. Some indoor grow operations run “clean green” operations which use clean-room level protocols. Other operations are lower-tech.
The first rule is: don’t go into your grow room with same clothes you wore to your FRIEND’s grow room. You don’t want to transfer any pests from their room to yours.
Research the types of pests which are common in your area and know that Ladybugs are your friends. They act like Roomba’s in your grow room, eating anything which could be a problem for the plants but leaving the plants alone.
Harvesting
Most strains are “auto-flowering” which means, when you ‘flip’ your lights from the 18+ hours of daylight to 12 hours of day and 12 hours of dark, the plants will start to flower. If a strain is a 90 day grow, the “90 days” start when you ‘flip’ the lights to 12/12.
This means, on or about day 90, your plants will be ripe and ready to harvest. How do you know if they’re ripe? That’s a conversation about trichomes. To learn more, read our article Trichomes, What the Heck are Trichomes.
Curing and Drying
Quite possible the most overlook aspect of learning how to grow marijuana is the curing and drying process. If you dry your weed to quickly, the flavor profile gets lost. If you take too much time, the risk of mold increases exponentially.
Fortunately, curing and drying is both art and science. The science part is this: your drying room needs to be pitch black, it needs to maintain a temperature of about 60 degrees Fahrenheit and about 60% humidity (use a dehumidifier if you need to).
When your science part is optimized, then the art part comes into play in deciding the “when” you plants are ready for the next step, called “bucking” (for snapping the buds off the stalks and putting them into a Bucket before they’re trimmed).
Usually, that moment is around day 12 or 14 of curing; you’ll know the plants are ready when a bud ‘snaps’ right off the stalk without any stalk-strings. You’ll know it when you get there.
Growing Marijuana Outdoors
The first thing to think about when you’re going to grow outdoors (or ‘sun grow’) is: what is the microclimate and terroir of the soil? Just like a vineyard, cannabis grows thrive when the strains are compatible with both the climate and the soil. So, how to you figure this out?
If you don’t have a friend who is showing you the ropes, then, it’ll be by testing. Your first season you’ll want to try two or three strains to see which thrive and which struggle.
When working with a mentor, work with someone who has grown successfully in your area – they’ll have a leg up on the strains and any unusual pests.
Space
The beauty about sun grows is that all you need is a container for your plants and a nice Southern exposure for maximum sunlight. You can grow one plant in a pot or you can set up a garden, it’s really all about your location and how much sunshine the plants will get.
Nutrients
Growing outdoors brings unique nutrient challenges to your garden. Again, if you’re working with a mentor, they’ll have a good idea of what to use. If you’re doing this on your own, you’ll want to research when to bump your plants with nitrogen versus when you should mix in phosphorus.
Pest Control
Outdoor pests are numerous and it’s almost impossible to ‘immunize’ your plants against them. You can, though, help them out by doing a couple of things. If you can get dried rice hulks (it looks just like hay), you an spread this on the ground around your plants.
The most common pest, dirt mites, HATE dried rice hulks, so, when you spread it on the ground, the mites won’t climb up your plants. You can also encourage beneficial insects (dragonflys and ladybugs for example) to visit your garden by putting other plants and flowers nearby to attract them.
Harvesting
As we discussed under indoor growing, harvesting is usually determined by both the grow cycle of the plants and the appearance of ‘ripe’ trichomes. With outdoor grows, the flowering is triggered by the Summer Solstice, so, typically, plants are put into the ground around the first or second week of May and allowed to “veg” until June 21st. On June 22nd, because the sun will be out one second less than it was on Solstice, the plants will automatically start to flower.
This is why outdoor cannabis harvests happen in late September and early October – most plants have a 90 to 120 day grow cycle.
Curing and Drying
Again, the curing and drying of marijuana is the most important step in the grow cycle. Since outdoor grows are an annual event, you don’t want to mess up all your hard work by either under or over drying your cannabis.
What To Do To Learn More
Book either a Happy Travelers Tours Farm Tour or Dispensary Tour and get up-close-and-personal with cannabis plants. Learn how to grow marijuana from industry professionals.
Our Dispensary Tour visits a state-of-the-art indoor grow and our Wine-and-Weed Tour visits a mountaintop outdoor grow.